
Overview
When a visitor opens the Chime guest web client, you often want the agent on the other side to see context that the chat itself doesn’t carry — the seeker’s account ID, the page they came from, the product they were looking at, anything that helps the agent skip the “who am I talking to” round-trip.
This is what the custom seeker-data feature is for. You host the Chime web client inside a page on your own server, attach a metadata object to that page, and the web client picks it up and forwards it to the backend. The values then show up in the agent’s context window under Details › User Settings.
How the pieces fit together
There are three moving parts:
- A static HTML wrapper page you author, which contains a metadata object and an
<iframe>. - The Chime Windows server, which hosts that page out of its
Contentdirectory. - The Chime guest web client inside the iframe, which reads the parent page’s metadata at load time and posts it along with the rest of the seeker data.
Step 1 — Create the wrapper page
Create an HTML file with a unique name — for example, custom-seeker-data.html. The two key pieces are the iframe that renders the guest web client and a script block that defines the metadata object. A minimal version looks like this:
<!doctype html>
<html>
  <head>
    <meta charset="utf-8" />
    <title>Talk to support</title>
    <script>
      // Read by the Chime web client when it loads inside the iframe.
      window.customMetadata = {
        US_account_id: "ACC-12345",
        US_plan: "Enterprise",
        US_referring_page: document.referrer
      };
    </script>
  </head>
  <body>
    <iframe
      src="https://your-chime-server.example.com/Chime/Guest/<queue-internal-url>"
      width="380"
      height="600"
      frameborder="0">
    </iframe>
  </body>
</html>
Step 2 — Point the iframe at your queue
The iframe src needs to be your queue’s Internal web client address. To find it, open the queue in Chime admin and go to Settings › Advanced. Paste that URL into the iframe in place of the placeholder above.
Step 3 — Pick your metadata fields
Every property on window.customMetadataends up in the agent’s context window. The one rule worth knowing: any field name prefixed with US_(User Settings) is surfaced under the agent’s Details › User Settingstab. Pick prefixes that make sense to whoever is going to triage chats — this is where the value of the feature comes from.
Step 4 — Deploy the page on the Chime server
Drop the file into the Chime Content directory on the Windows server hosting Chime:
C:\Program Files\Instant Technologies\Chime For Teams\ContentThe page is then reachable at:
https://<your-chime-server>/Chime/Content/<your-html-file>.htmlStep 5 — Verify on the agent side
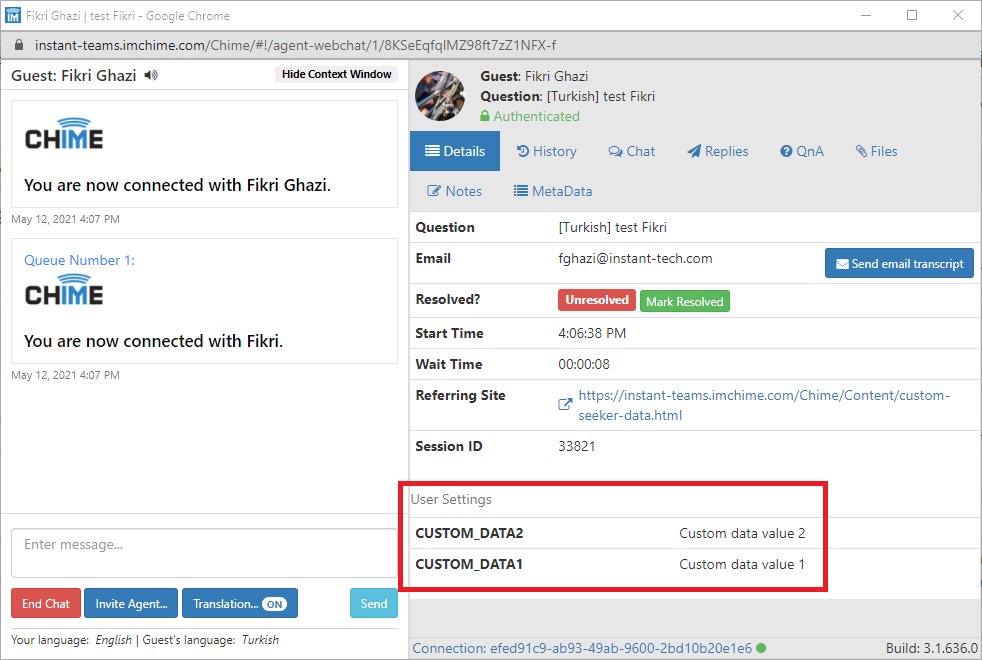
Open the page, fire off a test chat, and ask the agent to expand the seeker’s context window. The custom fields should appear under Details › User Settings:
Going dynamic with query strings
Hard-coding values in the wrapper page is fine for a single fixed context — a per-customer landing page, for example — but if you want the same page to handle many seekers, pull the metadata out of the URL. URLSearchParams makes that one short script block:
<script>
  const params = new URLSearchParams(window.location.search);

  window.customMetadata = {
    US_account_id:     params.get("account") || "anonymous",
    US_plan:           params.get("plan")    || "unknown",
    US_referring_page: document.referrer
  };
</script>
You can then link to /Chime/Content/custom-seeker-data.html?account=ACC-12345&plan=Enterprise from your portal and the agent picks up the right context every time.